

How To Draw A Dog How To Draw A Horse
Nearly anybody remembers going through a "horse phase." Whether it was sparked by a live encounter or from watching animal documentaries, it often leads to magical reveries of your own horse companion. So, why not put those fantasies to paper and practice cartoon the horse of your dreams?
In this tutorial, we will go through the steps of drawing a horse head from three dissimilar angles—profile, iii-quarter, and from the forepart. Then, for those ready to endeavor something more advanced, at that place will be instructions on how to draw a full horse body. Desire to requite information technology a become? So pick out your favorite horse pictures and grab your drawing supplies—let'south draw some horses!
Finding Reference Photos
It's adept practice to practice a flake of research before beginning whatever cartoon. In the case of horses, information technology's especially important to have a few skilful photos handy, as they're rather complex animals.
Since we're cartoon a horse in contour, be very selective. You'll desire to brand sure that y'all have a good view of its features with no obstructions (i.eastward. people, other animals, foliage). As nosotros get-go drawing, go along in mind that there are many breeds of horses with varying shapes of noses, so always expect to your reference photo first, as it may differ from the example shown.
How to Draw a Horse Head From the Side
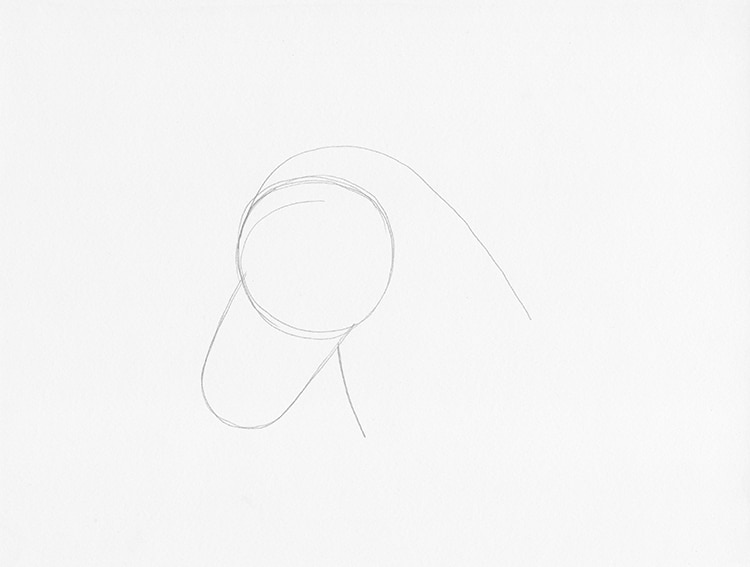
Pace 1: Lightly sketch the foundation
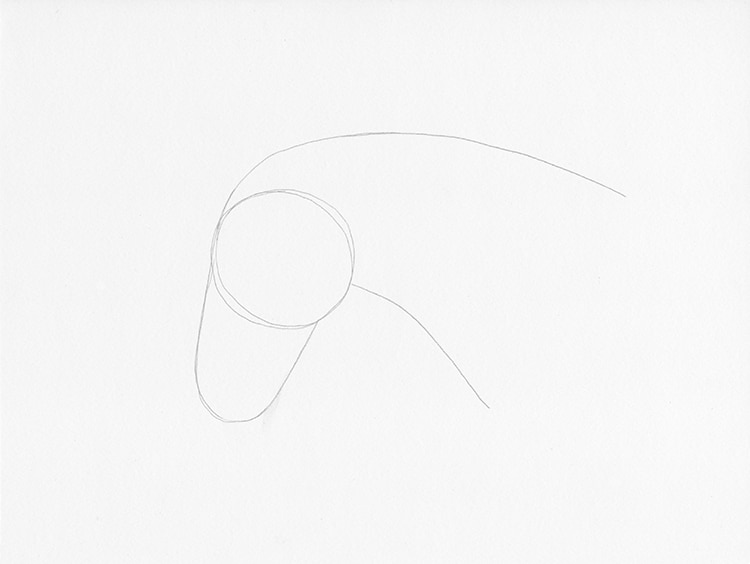
Photo & Art: Margherita Cole / My Mod Met
First, y'all'll want to draw the bones shapes of the horse head. Lightly sketch a circle for the head and a long, oval-similar shape for the nose. Consult your reference photo to encounter if you accept the basic proportions more or less in place, but don't worry too much if information technology isn't perfect.
Pace two: Place the ears, eyes, and mouth
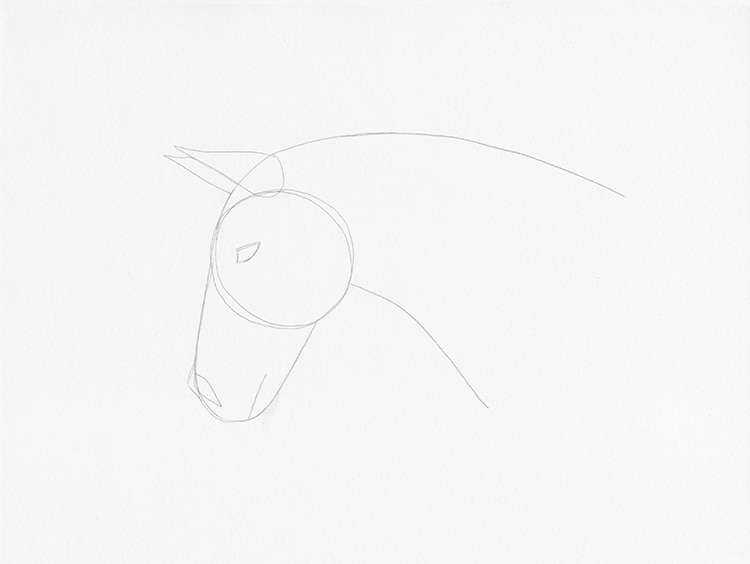
Photo & Art: Margherita Cole / My Modern Met
This step continues to expect at proportion as nosotros identify the horse's almost important features.
So, you'll want to add together two triangle shapes a fiddling in a higher place the circle sketch, nigh where information technology connects to the neck—these volition be the ears. At the very end of the oval shape, you can denote the nostril with another oval, and a line for the oral cavity. Since this horse head is in the profile we only have to draw one middle, merely make sure its placement is closer to the ears than the nostril. Y'all'll want the horse'due south centre to be halfway in the circle, not the whole caput.
Step 3: Add the mane
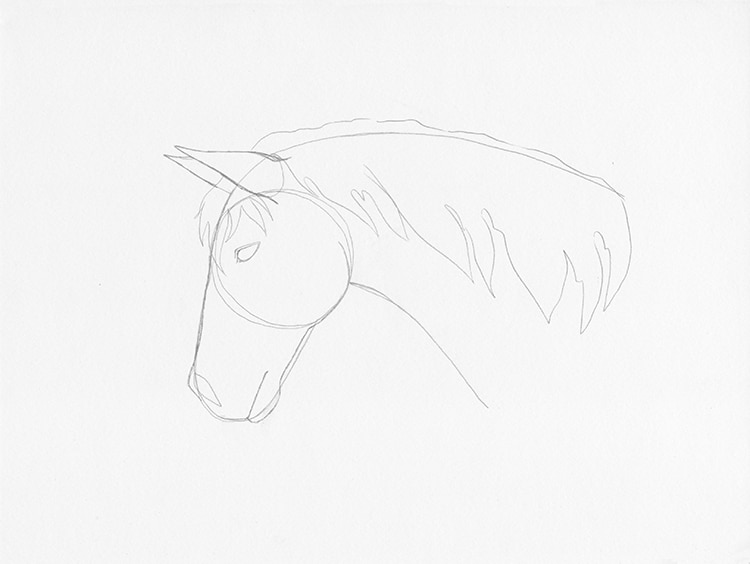
Photo & Art: Margherita Cole / My Mod Met
At this stage, you tin can begin to cleave out the final outline of the equus caballus head from the circle and oval shapes yous already laid out. Always keep your reference photo handy to see if you are going in the right direction.
Afterward, you lot can advantage yourself with a bit of creativity in designing your equus caballus's mane. Wavy, straight, braided—there are many fun possibilities to choose from. Searching places similar Pinterest and Instagram will inspire you with many ideas.
Step 4: Erase your guidelines
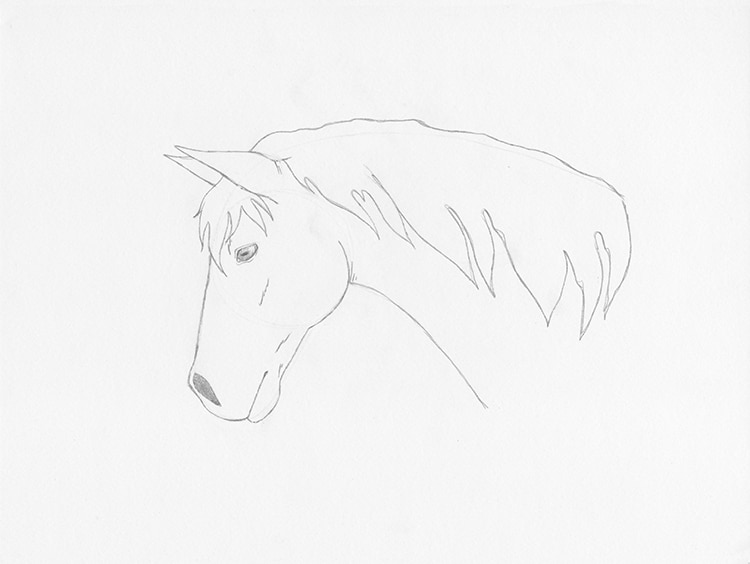
Photograph & Art: Margherita Cole / My Modern Met
One time yous're content with the final drawing, it's time to erase the bones shapes from the first stride. At this fourth dimension, y'all can wait over your horse and check with your reference photo to see if whatsoever adjustments need to exist made. You lot can also add the student and lashes to the eye, every bit well as other finer details.
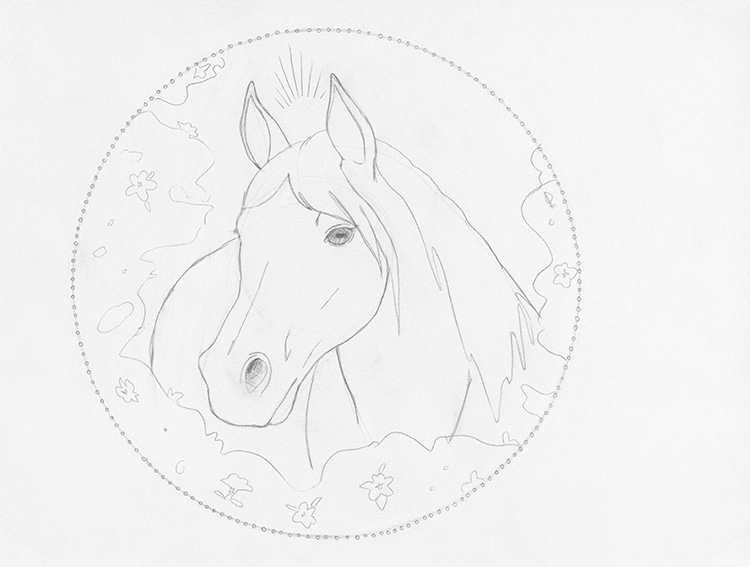
Optional: Add together a border and decorative elements
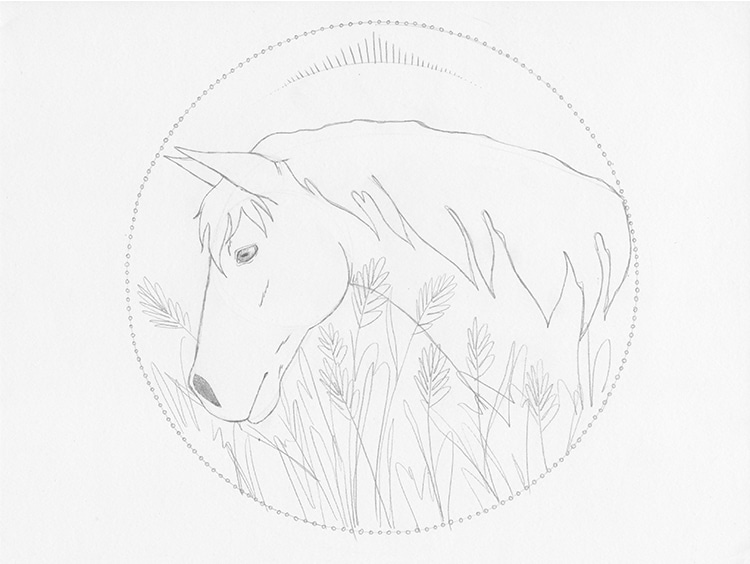
Photo & Art: Margherita Cole / My Modern Met
Even if you're just cartoon this horse head for practice, why not accept ane more pace and brand it a complete illustration? To make an easy border, all y'all'll need is a ruler or protractor. For a square edge, measure a box around the horse's face. Alternatively, use the protractor to draw a circle. You can and then draw minor dots forth the curved line for a more than delicate effect.
If you want to fill up in the empty space, consider adding some flora, like wheat, trees, or some other animal.
Step 5: Go over the drawing with ink and/or color
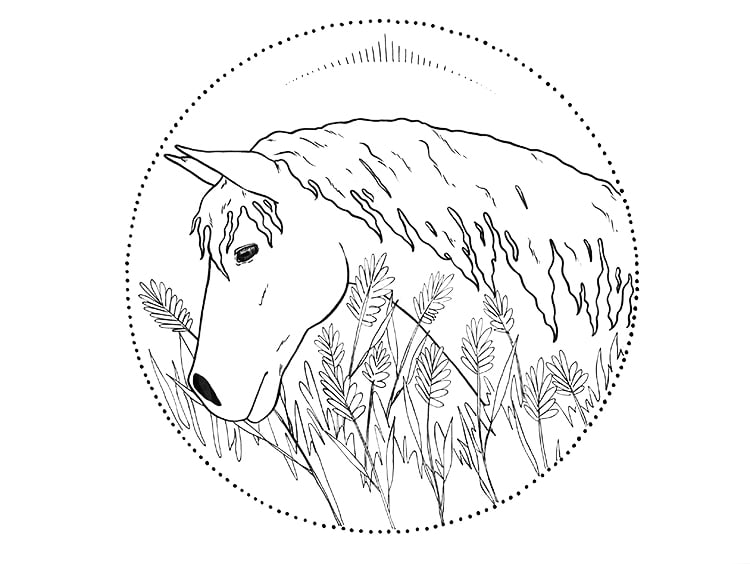
Photo & Fine art: Margherita Cole / My Modern Met
If yous've decided to get over your drawing in ink, and then pull out your pen drove and observe a favorite. You can either go over the graphite lines with the same pen for a consistent look or—if y'all have pens with varying nibs—attempt using a bolder pen for the horse and a finer line for the extra elements. This fashion, the horse head will stand out.
Remember to take a few extra minutes to permit the ink dry out earlier you begin erasing, only in case. Later on enough time has passed, slowly erase any visible sketch lines and voila! You now know how to draw a horse head from the side!
How to Draw a Horse Head in Three-Quarter View
Step 1: Lightly sketch the foundation
Photograph & Art: Margherita Cole / My Modern Met
First, yous'll want to draw the bones shapes of the equus caballus head. Lightly sketch a circumvolve for the head, and long oval-like shape for the olfactory organ. Then, loosely sketch the neck, making sure that it's fairly wide. Go on your reference photo handy to check in with as you lot continue to build your drawing.
Stride two: Place the ears, optics, and mouth
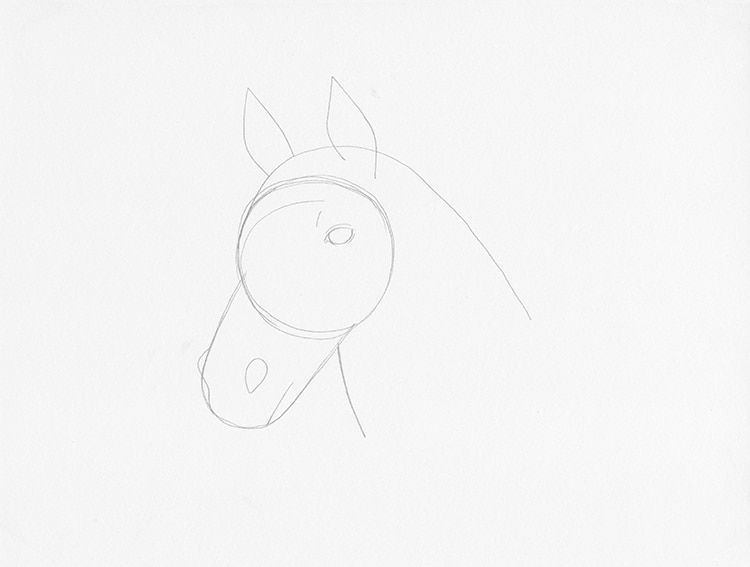
Photo & Art: Margherita Cole / My Modern Met
This step continues to wait at proportion equally we identify the horse'due south well-nigh of import features.
So, you'll want to add together 2 triangle-like shapes a piddling above the circle sketch, near where it connects to the cervix—these will be the ears. At the very end of the oval shape, yous can denote the visible nostril with another oval, and a raised crash-land for the one slightly out of view. Slightly beneath, you lot can depict a curt line for the mouth.
In 3-quarter view, 1 eye of the equus caballus is clearly in view whilst the other is indicated, much like nosotros did for the nose. For at present, gently draw an almond shape a little beneath the ear for the visible eye.
Step 4: Add the mane
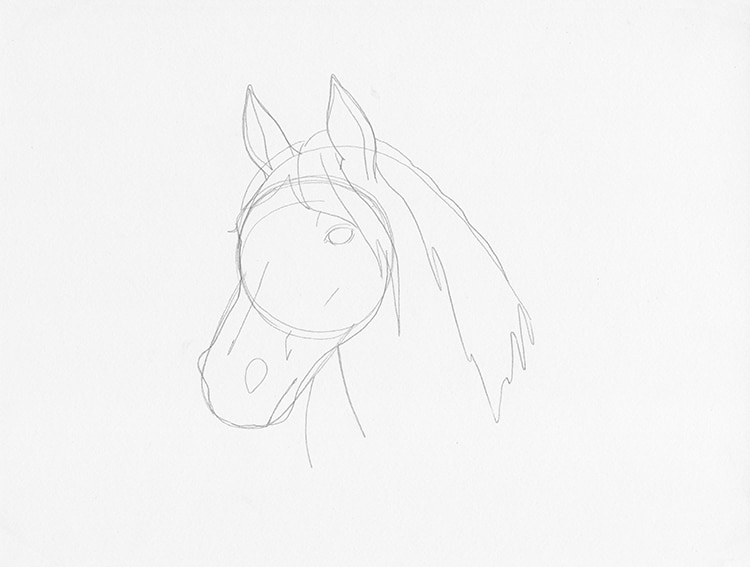
Photo & Fine art: Margherita Cole / My Modern Met
At this stage, you tin begin to carve out the concluding outline of the horse head from the circle and oval shapes y'all already laid out. Always keep your reference photograph handy to see if you lot are going in the right direction.
As you move along the bridge of the nose, pay attention to keeping a raised bump for the obscured nostril and the other eye. Horses have cute long lashes, then be sure to include a few in the aforementioned place!
Afterward, you can reward yourself with a bit of creativity in designing your horse's mane. Wavy, directly, braided—in that location are many fun possibilities to cull from. Searching places like Pinterest and Instagram will inspire y'all with many ideas.
Stride 4: Erase any guidelines

Photo & Fine art: Margherita Cole / My Modern Met
Once you're content with the final drawing, it's time to erase the basic shapes from the first step. At this time y'all tin can look over your horse and bank check with your reference photograph run across if any adjustments need to exist made. You can besides add together the pupil and lashes to the prominent centre, likewise equally other effectively details to the nostril and mane.
Optional: Add together decorative elements
Photograph & Fine art: Margherita Cole / My Modernistic Met
Even if yous're only drawing this horse head for exercise, why not take one more than footstep and make information technology a consummate illustration? To make an easy border, all you lot'll need is a ruler or protractor. For a foursquare border, measure a box around the equus caballus'south face up. Alternatively, utilise the protractor to draw a circumvolve. You tin then depict small dots along the curved line for a more delicate effect.
If y'all want to fill up in the empty infinite, consider calculation some flora, like wheat, copse, or another animal.
Step five: Go over the drawing in ink and/or color
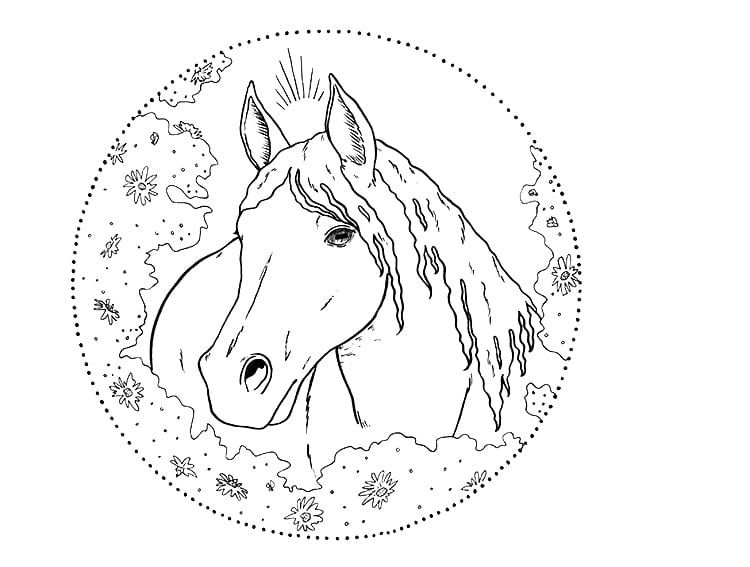
Photo & Art: Margherita Cole / My Modernistic Met
If you lot've decided to go over your cartoon in ink, and then pull out your pen collection and notice a favorite. Consider placing a spare piece of paper nether your drawing manus. This fashion you tin can go over the graphite lines without worrying about smudging the ink.
Afterwards, slowly erase whatsoever visible sketch lines and ta-da. You now know how to describe a horse caput in iii-quarter view!
How to Draw a Horse Caput From the Front
Stride 1: Sketch the bones shapes
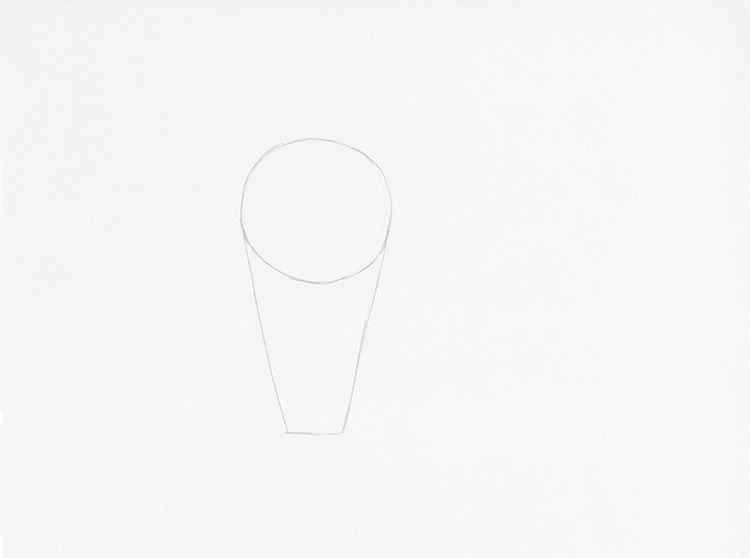
Photo & Art: Margherita Cole / My Modern Met
First, you lot'll want to draw the basic shapes of the horse caput. Lightly sketch a circle for the caput, and long oval-like shape for the nose. A equus caballus's caput looks longer and thinner in the front view, so be certain to confer with your reference photo as yous work.
Step two: Place the ears, eyes, and mouth
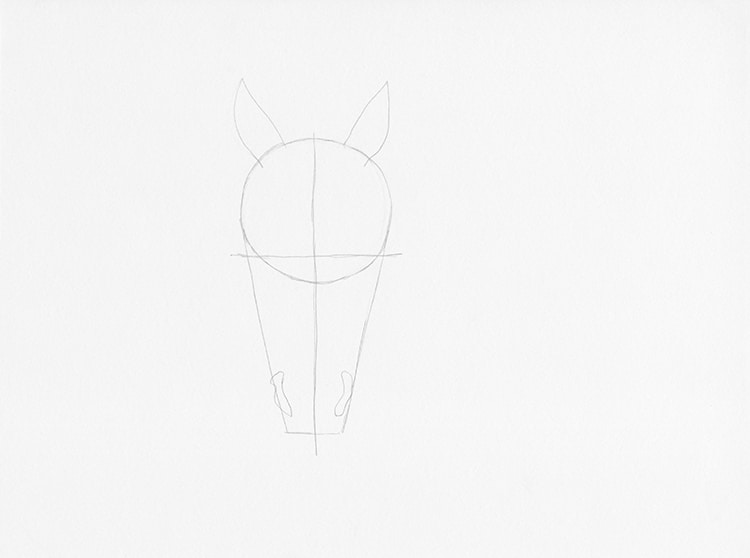
Photo & Fine art: Margherita Cole / My Mod Met
This footstep continues to wait at proportion equally nosotros place the equus caballus's most of import features. When drawing a horse from the front, it's key to make its facial features as balanced every bit possible. Therefore, before you continue drawing, consider placing a vertical line in the eye of the horse caput, and a horizontal line towards the bottom of the circle. You lot can exercise this freehand or, for more precise lines, with the aid of a ruler.
Once the lines are in place, yous can add two triangle shapes at the very superlative of the circle, which will be the ears. Side by side, loosely draw one-half-almond optics in the middle of the horizontal line, ending more than or less at the circumvolve'due south border. Moving to the bottom of the nose—identify ii ellipsoidal-shaped nostrils at the very edge of the outline.
Later on you've sketched all of the equus caballus's facial features you lot tin can go back and adapt their balance as necessary. If it's hard for you to tell, try looking at the drawing from different angles or different distances.
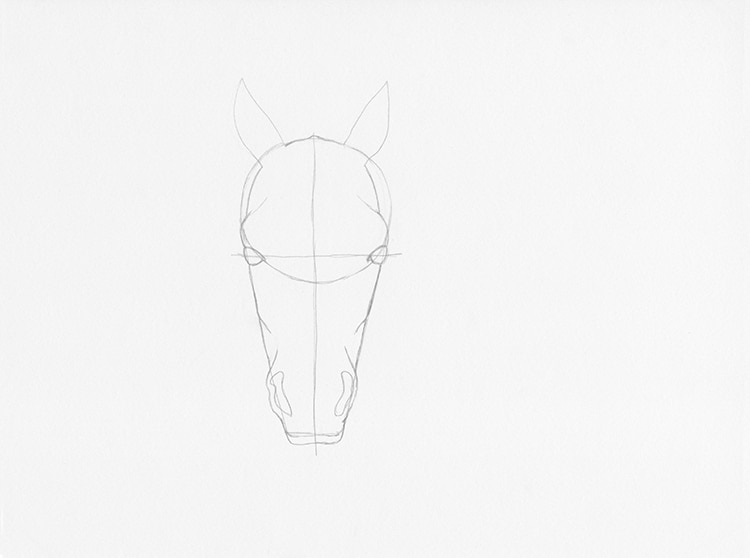
Photo & Art: Margherita Cole / My Modern Met
Step 3: Refine the outline
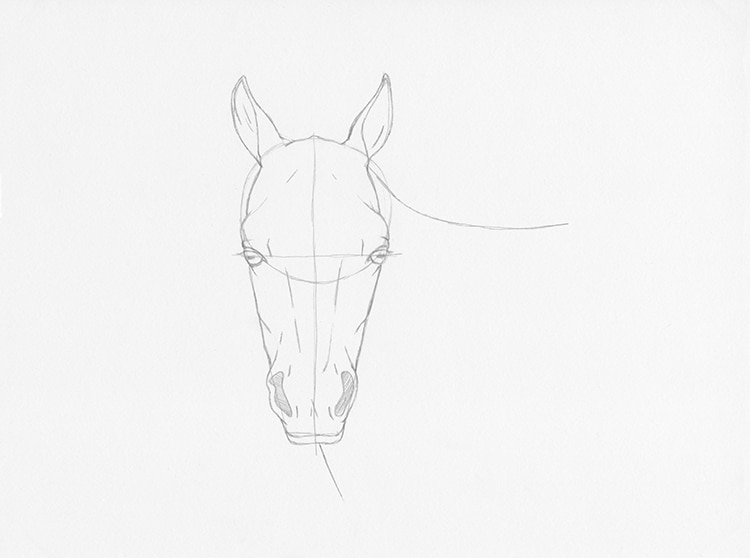
Photo & Art: Margherita Cole / My Modernistic Met
At this stage, yous can begin to carve out the final outline of the equus caballus head from the circle and oval shapes you already laid out. Always keep your reference photo handy to see if yous are going in the correct management.
Exist conscientious of the left and correct sides of the face. Horse's have a rather bumpy face up, so try your all-time to keep these features as even as possible. If y'all nonetheless have doubts, consider request a friend for their stance.
Footstep 4: Add together the mane & erase unnecessary guidelines

Photo & Fine art: Margherita Cole / My Modern Met
Now that the hard office is over you lot can advantage yourself with a bit of creativity past designing your horse'south mane. If you like longer manes, think about how it volition frame your equus caballus's face.
Once y'all're content with the terminal drawing, it's time to erase the bones shapes from the beginning step. At this time, y'all can look over your horse and check with your reference photo run across if any adjustments need to be made. You tin can also add the pupil and lashes to the centre if you haven't done so already.
Optional: Add decorative elements
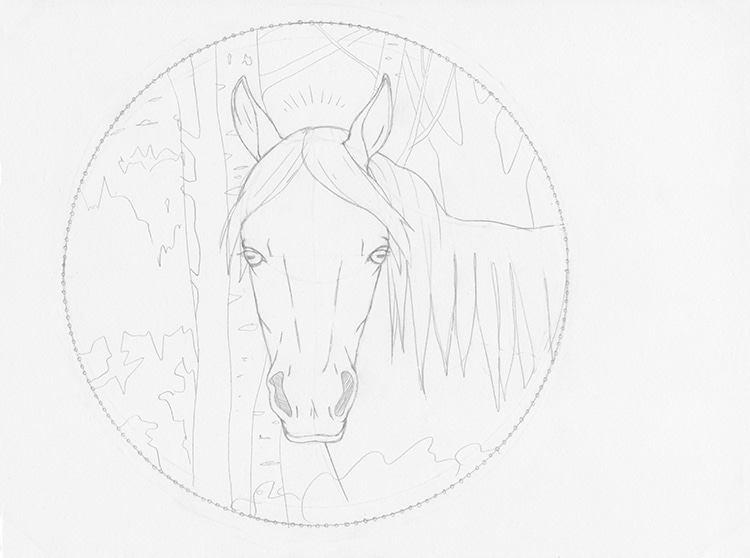
Photo & Fine art: Margherita Cole / My Modern Met
Fifty-fifty if yous're simply drawing this horse caput for practice, why not take one more footstep and make it a complete illustration? To make an easy border, all you'll need is a ruler or protractor. For a square border, measure out a box effectually the horse's face. Alternatively, utilise the protractor to draw a circumvolve. You can then draw small dots forth the curved line for a more than fragile upshot.
If yous want to fill in the empty space, consider adding some flora, wheat, trees, or some other animal.
Stride 5: Become over the cartoon in ink and/or colour
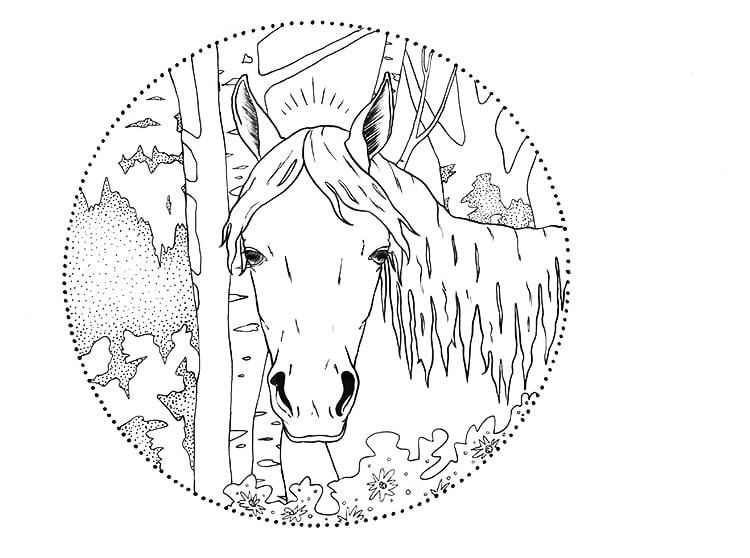
Photo & Art: Margherita Cole / My Modern Met
If you've decided to go over your drawing in ink, so pull out your pen collection and discover a favorite. Once you've gone forth all of the graphite lines, consider adding texture to the illustration to make information technology pop. Hatching and cartoon dots are two easy ways to cover blank space in an interesting manner.
One time the ink has dried, slowly erase whatever visible sketch lines and presto. You lot now know how to draw a horse caput from the forepart!
Exercise yous feel prepare to try drawing the torso? Then follow along to larn how to draw a horse pace by footstep.
Step i: Lightly sketch the basic shapes
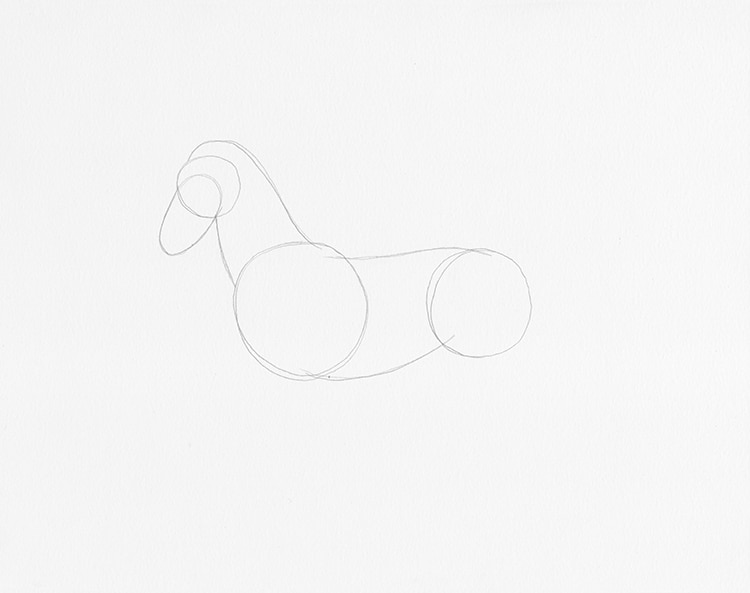
Photo & Art: Margherita Cole / My Modernistic Met
Just like we did for the head of the equus caballus, you'll desire to begin by drawing the bones shapes of the equus caballus'south torso. Lightly sketch a circle for the head, and long oval-like shape for the nose. Connect the head to a thick cervix which continues to the large circle of the chest. This will connect to a smaller circle by way of two gently sloping lines. Consult your reference photograph to see if you lot have the basic proportions more or less in place, simply don't worry too much if it isn't perfect.
Step ii: Add the legs
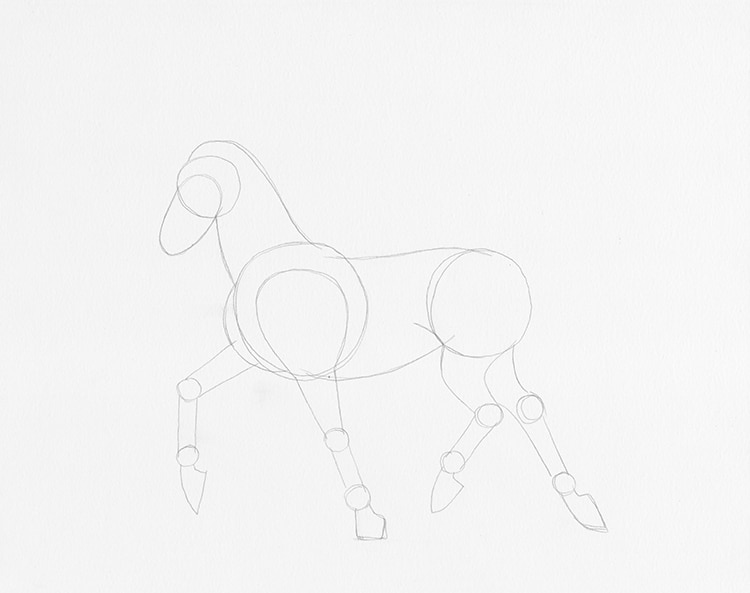
Photo & Fine art: Margherita Cole / My Modern Met
With the abdomen in identify, we can now plough our attending to the legs. Go on in listen that compared to their body, horses have rather thin and knobby legs, not to mention long limbs. Also, if your horse is in move, be sure to double-check that the folded legs have the same proportions every bit the extended ones.
Footstep iii: Place facial features, mane, and tail

Photograph & Art: Margherita Cole / My Modern Met
One time you feel content with the general sketch, it'due south time to place a few details. Since y'all've already drawn a horse head from three unlike angles, you probably already know what comes next.
Begin past loosely drawing 2 triangle shapes at the top of the horse'south head for the ears. So, moving a trivial down, loosely sketch an almond eye. Afterward, you can become to the bottom of the nose and place an oval-shaped nostril. Just beneath that, signal the horse's mouth with a quick line.
Whilst we're placing details, experience complimentary to describe your preferred mane and tail. If your horse is trotting or galloping, exist sure to have information technology flowing in the air current.
Optional: Add actress elements to the composition
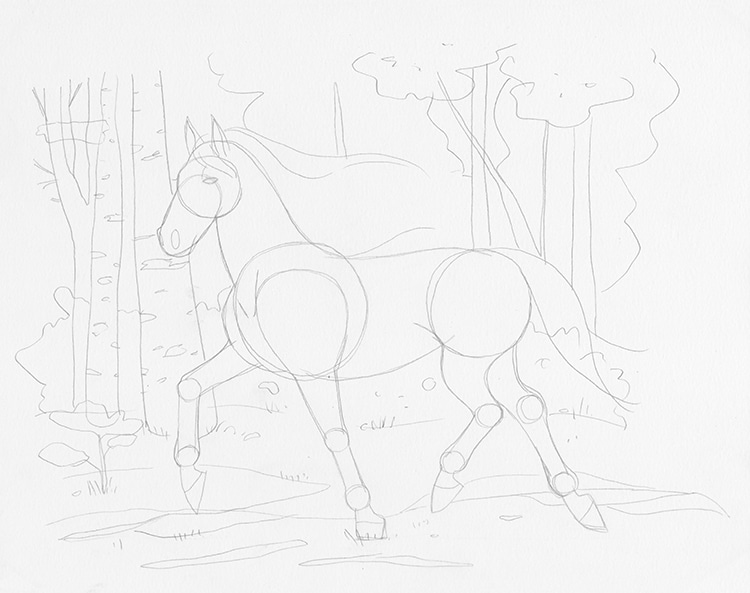
Photo & Art: Margherita Cole / My Modern Met
Since you've already drawn the sketch of the horse, why not take one more stride and brand it a complete illustration? An piece of cake way to do this is to fill the empty space with leaf similar trees, bushes, and flowers to the groundwork. These extra elements volition ground your horse and requite the composition a sense of space and perspective.
Step 4: Erase unnecessary guidelines

Photo & Art: Margherita Cole / My Modern Met
Since you're making the effort to draw a horse, why non ground it in a complete limerick? To do this, all you demand to practise is brainstorm an platonic setting for your effigy. A meadow or forest are ii archetype settings to think nearly.
To take it ane step further, pull out a ruler and describe a border effectually your analogy. You tin can add flowers or geometric designs for a truly fairytale feeling.
Step 5: Become over the drawing with ink and/or colour
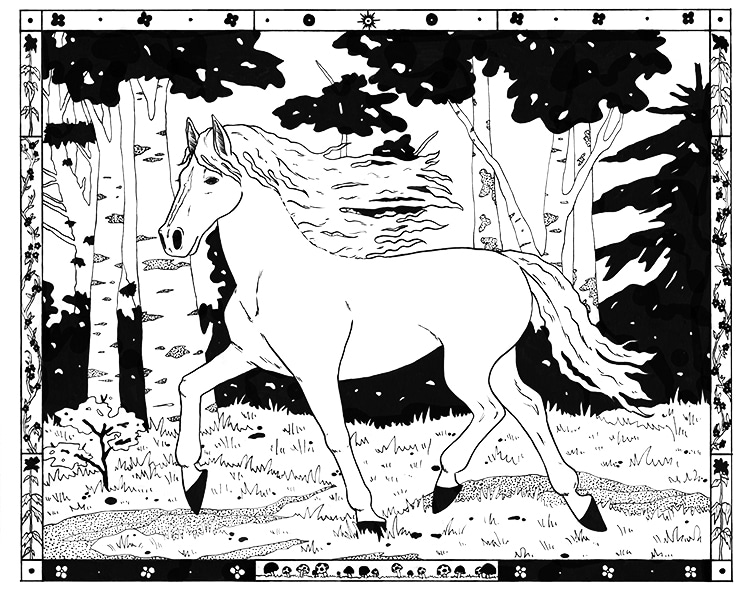
Photo & Art: Margherita Cole / My Modern Met
If you've decided to become over your drawing in ink, then pull out your pen collection and discover a favorite. Keep in heed that when you make an analogy in pen, information technology helps to have a residual of black and white infinite on the paper. For instance, if your horse is white, consider contrasting it with black trees or a black heaven. This volition make the horse stand out and result in a more pleasing paradigm to look at.
Subsequently yous've immune sufficient time for the ink to dry, slowly erase any visible sketch lines and at that place you have information technology. You now know how to describe a horse trotting!
Looking for others who love drawing? Join our Art, Design, Photography, and Drawing Society on Facebook!
Related Articles:
Build Your Drawing Foundation When Yous Learn How to Draw a Skull
Perfect Your Portraiture by Learning How to Draw a Face up Step by Step
Learn How to Draw a Dog with This Simple Pace-by-Step Sketching Guide
Learn How to Draw Human being Hands With This "Handy" Footstep by Footstep Guide

Source: https://mymodernmet.com/how-to-draw-a-horse/
Posted by: davisthattere.blogspot.com
0 Response to "How To Draw A Dog How To Draw A Horse"
Post a Comment