

How To Create Icon From Png
How to create an icon in Windows 10 [Full Guide]
Matthew is a freelancer who has produced a variety of articles on various topics related to technology. His main focus is the Windows OS and all the things surrounding it. He is passionate about... Read more
Updated: Posted: July 2020
- Adding your own unique icon designs to the desktop is a great way to customize Windows 10.
- This article provides guidelines for designing your own desktop icons with Paint 3D.
- Our Graphics & Design section includes a plethora of graphics design software guides.
- Look no further than our How-To Hub for many more Windows 10 software guides.
![]()
Windows 10 displays shortcuts on its desktop with icons, which are a big aspect of the platform's themes.
If you fancy giving Windows a bit of a makeover, customizing desktop icons is a good way to do it. You can create your own custom icons for desktop shortcuts.
All you'll need to set up your own icons is one art (or graphic) design application.
Windows 10 includes the Paint and Paint 3D design apps. You can set up new icons with either software. However, Paint 3D is a better-equipped package as it enables users to add 3D shapes and stickers to their icons.
How to make a custom icon in Windows 10?
1. Use Adobe Illustrator
- Download Adobe Illustrator and install it.
- Go to File and select New.
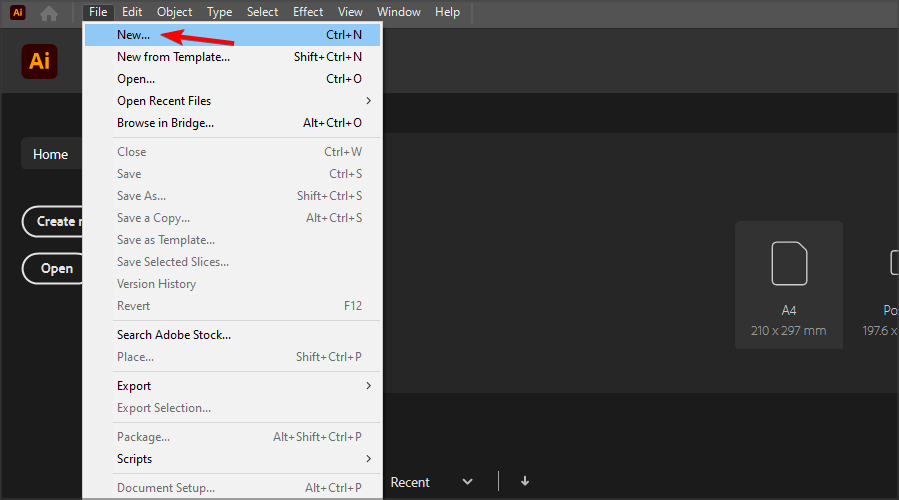
- Set unit to Pixels and set width and height to 256px. Click on Create.

- Create your icon using the available tools.
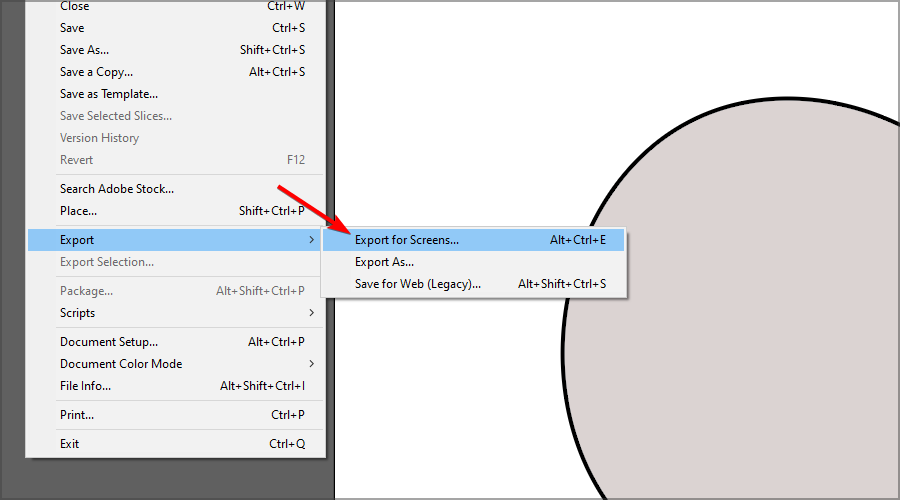
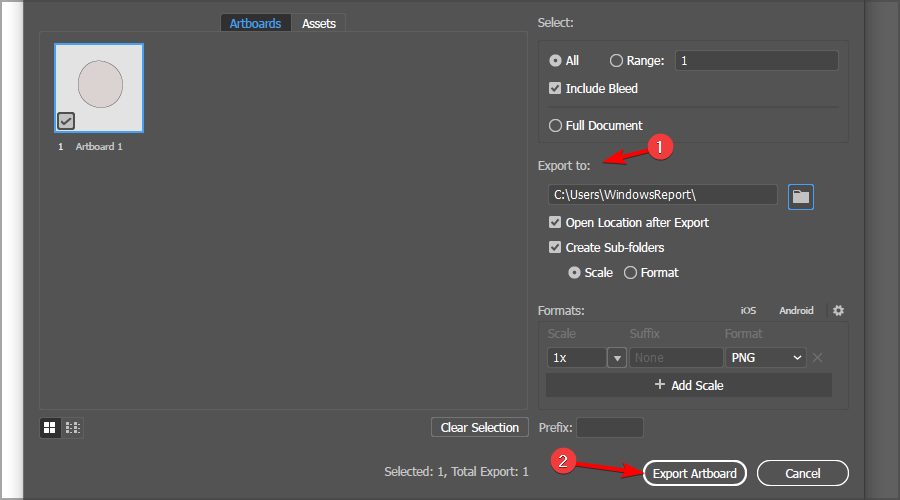
- Once you're done, go to File and expand the Export section. Select Export for Screens.
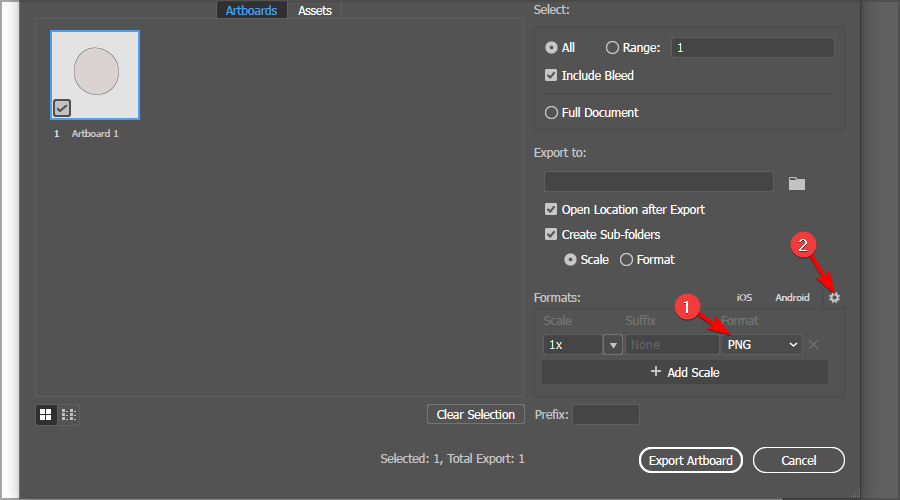
- Set the format to PNG and click the gear icon.
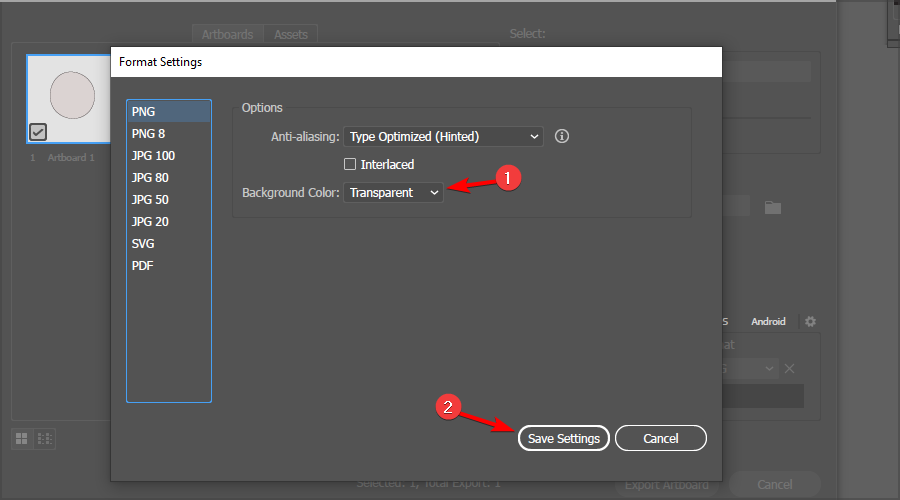
- Change the Background color to Transparent. Click on Save settings.
- In the Export to set your save location and click on Export Artboard.
2. Create an icon with Paint 3D
Set up the canvas
- First, click the Start button.
- Click Paint 3D on the Start menu's software index.
- Click New in Paint 3D.

- Select Canvas to open the options shown directly below.

- Enter 32 in both the Width the Height boxes to resize the canvas to 32 x 32.
- Roll your mouse wheel to zoom in on, and expand the canvas.

- Toggle the Transparent canvas option on.
Design the icon
- You can draw a picture on your icon's canvas by selecting Brushes. You'll need to select Marker or Pixel Pen at a 1 px weighting.

- To add lines and two-dimensional shapes, select the 2D shapes tab. Then select a line, curve, or shape option there.
- Paint 3D's 3D shapes tab includes a variety of options for adding three-dimensional shapes and models to your icon. Click 3D shapes to open that tab.

- Select a 3D object or model option on the sidebar. Then hold the left mouse button and drag the cursor right to expand the selected shape so it fits within your icon's canvas.
- Click the shape on the canvas to open its rotation options as in the shot directly below.

Customize your icon with stickers
- Paint 3D also includes a relatively small collection of stickers you can utilize for icons. Click the Stickers tab.

- Select a sticker for the icon.
- Click outside the icon's canvas area on the left of the window to add the selected sticker.
- Left-click the top right corner of the sticker, and drag the mouse left to shrink the picture to fit within the canvas.
- Select the image and hold the mouse button to drag it into the canvas.
- Press the Make 3D button to apply a 3D effect. You can rotate the sticker much the same as 3D shapes.

- You can click Custom stickers > Add stickers to select downloaded clip art for your icons.
Customize your icon with 3D objects
- Paint 3D also has a collection of 3D images you can add to your icons. Click 3D library to browse through the various image categories.

- Click an image to add it to your canvas.
- You'll probably need to greatly scale down the selected image to fit it within your icon's canvas. To scale down an image, click its top right corner, hold the left mouse button, and drag the cursor left.
Save the icon design as an image
- When you've finished your icon design, click Menu > Save As > Image.

- If you added a 3D model to your icon, an image preview will open as in the snapshot directly below. Select PNG on the Save as type menu.

- Press the Save button.
- Select a folder to save the PNG image in.
- Select 2D – PNG as the file format.
- Enter a title for the image, and click the Save option.
Want to simplify the process of creating your icons? Check out our 6 best icon maker software guide
3. How do I convert a JPEG to an icon in Windows 10?
- You can convert PNG, JPEG, and JPG files to icons at the Online-Convert website. So, open that website's Online image convert page in a browser.

- Click Choose files to select the icon PNG you set up in Paint 3D.
- Press the Start conversion button.
- Then click the Download button.
4. How to add new icons to the desktop
- Now you can add your new icon to the Windows 10 desktop. To do so, right-click a shortcut icon already on the desktop and select Properties.
- Select the Customize tab on the window that opens.

- Press the Change Icon button.
- Click the Browse button on the Change Icon window.

- Then select your ICO file in the folder it downloaded to.
- Click the Open button.
- Click OK on the Change Icon window.
- Finally, select the Apply option.
- Click OK to exit the window.
- Now your custom icon will have replaced the original one on the desktop. The heart icon in the snapshot below was one set up with Paint 3D.
So, that's how you can set up your own custom icons with Paint 3D.
You can also design your own icon sets with numerous icon maker software.
Our icon maker guide provides details for Windows 10's best icon maker software.
How To Create Icon From Png
Source: https://windowsreport.com/how-to-make-an-icon/
Posted by: davisthattere.blogspot.com
0 Response to "How To Create Icon From Png"
Post a Comment